- Manual assembly time
- 6–20h
- AI generation time
- < 30s
What We Build
A Complete OM Generation Pipeline
By the end of this guide, you will have a fully automated system that accepts structured property inputs and produces a professionally branded, multi-page PDF Offering Memorandum ready to send to investors.
- Generates executive summary and narrative with GPT-4
- Computes financial metrics (cap rate, NOI, rent roll) in Python
- Creates tenant income pie charts with Matplotlib
- Builds multi-page HTML template with Jinja2
- Exports pixel-perfect PDF via WeasyPrint
On the buy side the problem runs in reverse: reading OMs that arrive in every format. See AI OM parsing and the offering memorandum parsing case study.
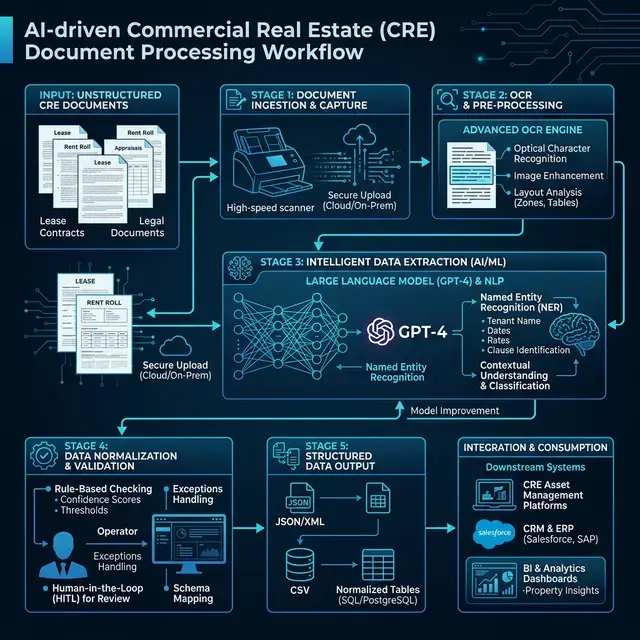
AI Workflow
- 01Property Data + Images
- 02LLM Narrative Generation
- 03Financial Analysis + Charts
- 04Multi-Page HTML Template
- 05PDF Export (10–20 Pages)
System Architecture
The Full Pipeline Architecture
This modular architecture lets you swap components (GPT-4 → Claude, WeasyPrint → Puppeteer) without touching the pipeline logic.
Scalable
Handle one OM or thousands per month with the same pipeline.
Brandable
Inject any brokerage logo, color scheme, and boilerplate.
CRM-Ready
Accepts inputs from REST APIs, databases, or flat files.
Production-Proven
The same approach AxcelerateAI uses for enterprise clients.
Tech Stack
Tools & Libraries
| Tool | Purpose |
|---|---|
| Python | Main backend & orchestration |
| Pandas | Financial analysis & rent roll |
| OpenAI API (GPT-4) | AI narrative text generation |
| Jinja2 | HTML document templates |
| Matplotlib | Chart & graph generation |
| WeasyPrint | HTML → PDF rendering |
| Pillow | Image resizing & normalization |
Install everything in one command:
pip install openai pandas matplotlib jinja2 weasyprint pillowStep 1
Define Your Property Input Schema
The schema is the single source of truth for your entire pipeline. It includes property info, images, branding, and financial data. In production, this is populated automatically via a CRM API.
property_data = {
    "property_name": "Midtown Office Tower",
    "location":      "Dallas, TX",
    "price":         19_500_000,
    "noi":           1_240_000,
    "cap_rate":      6.4,
    "year_built":    2015,
    "square_feet":   85_000,

    "images": [
        "images/property_front.jpg",
        "images/lobby.jpg",
        "images/aerial.jpg"
    ],

    "broker_logo": "images/company_logo.png",

    "tenants": [
        {"name": "TechCorp", "rent": 32_000},
        {"name": "FinServe", "rent": 27_000},
    ]
}
Production tip: In an enterprise setup, this dictionary is populated automatically via your CRM's REST API — eliminating all manual data entry.
Step 2
Generate Narrative Sections with AI
GPT-4 writes the executive summary, investment highlights, and location description using structured property data. Grounding prompts in facts eliminates hallucinations.
from openai import OpenAI

client = OpenAI()

def generate_executive_summary(data: dict) -> str:
    prompt = f"""
    Write a professional executive summary for a commercial
    real estate Offering Memorandum.

    Property: {data["property_name"]}
    Location: {data["location"]}
    NOI: ${data["noi"]:,}
    Cap Rate: {data["cap_rate"]}%
    Year Built: {data["year_built"]}
    Square Feet: {data["square_feet"]:,}

    Tone: authoritative, investor-focused, concise.
    Length: 3 paragraphs maximum.
    """
    response = client.chat.completions.create(
        model="gpt-4o",
        messages=[{"role": "user", "content": prompt}]
    )
    return response.choices[0].message.content

summary = generate_executive_summary(property_data)
Output
Midtown Office Tower presents a compelling investment opportunity in the Dallas office market. Built in 2015 to institutional standards, the property offers modern amenities in one of Dallas's most active commercial corridors.
With a stabilized Net Operating Income of $1,240,000 and a market cap rate of 6.4%, this asset offers exceptional risk-adjusted returns...
Step 3
Compute Financial Tables with Pandas
Never ask an LLM to do arithmetic. Compute all financial metrics programmatically in Pandas — it ensures accuracy and produces DataFrames that inject cleanly into HTML templates.
import pandas as pd

def build_rent_roll(data: dict) -> tuple[pd.DataFrame, dict]:
    df = pd.DataFrame(data["tenants"])
    df["rent_annual"] = df["rent"] * 12
    df["pct_of_total"] = (df["rent"] / df["rent"].sum() * 100).round(1)

    metrics = {
        "total_monthly_rent": df["rent"].sum(),
        "total_annual_rent":  df["rent_annual"].sum(),
        "cap_rate_computed":  round(data["noi"] / data["price"] * 100, 2),
        "price_per_sf":       round(data["price"] / data["square_feet"], 2),
    }
    return df, metrics

rent_roll_df, metrics = build_rent_roll(property_data)
print(rent_roll_df)
print(metrics)
Output
         name   rent  rent_annual  pct_of_total
0     TechCorp  32000       384000          54.2
1     FinServe  27000       324000          45.8

{'total_monthly_rent': 59000, 'cap_rate_computed': 6.36, 'price_per_sf': 229.41}Step 4
Generate Investor Charts
Charts dramatically improve investor readability. Matplotlib renders a donut chart per tenant and saves it as an image file, which is then embedded into the OM template.
import matplotlib.pyplot as plt

def generate_tenant_chart(df: pd.DataFrame, output_path: str = "tenant_chart.png"):
    fig, ax = plt.subplots(figsize=(7, 7))
    colors = ["#1e3a5f", "#2563eb", "#60a5fa"]

    wedges, texts, autotexts = ax.pie(
        df["rent"],
        labels=df["name"],
        autopct="%1.1f%%",
        colors=colors,
        startangle=90,
        wedgeprops=dict(width=0.6)   # Donut style
    )
    ax.set_title("Tenant Income Distribution", fontsize=16, fontweight="bold")
    fig.savefig(output_path, dpi=150, bbox_inches="tight", transparent=True)
    plt.close()
    return output_path

chart_path = generate_tenant_chart(rent_roll_df)
Pro tip: Use transparent=True so the chart blends seamlessly into both dark and light OM templates.
Step 5
Build the Multi-Page HTML Template
Jinja2 renders your data into a professional multi-page HTML document. CSS page-break rules ensure each section prints on its own dedicated page.
Page Structure
- Pg 1Cover Page
- Pg 2Exec. Summary
- Pg 3Property Overview
- Pg 4Investment Highlights
- Pg 5Location Analysis
- Pg 6Financial Overview
- Pg 7Rent Roll Chart
- Pg 8Image Gallery
- Pg 9Broker Contact
{# om_template.html #}
<html>
<head>
  <style>
    .page { page-break-after: always; padding: 60px; }
    .cover { background: #1e3a5f; color: white; text-align: center; }
    .hero-image { width: 100%; border-radius: 12px; margin-top: 30px; }
  </style>
</head>
<body>

  <!-- Cover Page -->
  <div class="page cover">
    <img src="{{ broker_logo }}" style="height: 60px;">
    <h1>{{ property_name }}</h1>
    <h2>{{ location }}</h2>
    <img src="{{ images[0] }}" class="hero-image">
  </div>

  <!-- Executive Summary -->
  <div class="page">
    <h2>Executive Summary</h2>
    <p>{{ summary }}</p>
  </div>

  <!-- Rent Roll -->
  <div class="page">
    <h2>Tenant Rent Roll</h2>
    {{ rent_roll_table | safe }}
    <img src="{{ chart_path }}" style="width: 50%; margin: auto;">
  </div>

  <!-- Gallery -->
  <div class="page">
    <h2>Property Gallery</h2>
    {% for image in images %}
    <img src="{{ image }}" class="hero-image">
    {% endfor %}
  </div>

</body>
</html>Step 6
Normalize and Inject Property Images
Use Pillow to standardize all property images to a consistent resolution before insertion. Then render the template with Jinja2 to produce the final HTML document.
from PIL import Image as PILImage
from pathlib import Path
from jinja2 import Environment, FileSystemLoader

def normalize_images(paths: list[str], size=(1400, 900)) -> list[str]:
    """Standardize all images to the same resolution."""
    out = []
    for path in paths:
        img = PILImage.open(path).convert("RGB")
        img.thumbnail(size, PILImage.LANCZOS)
        out_path = f"normalized_{Path(path).name}"
        img.save(out_path, quality=92)
        out.append(out_path)
    return out

def render_om_html(data, summary, rent_roll_df, metrics, chart_path) -> str:
    env = Environment(loader=FileSystemLoader("."))
    template = env.get_template("om_template.html")

    return template.render(
        property_name=data["property_name"],
        location=data["location"],
        broker_logo=data["broker_logo"],
        images=normalize_images(data["images"]),
        summary=summary,
        rent_roll_table=rent_roll_df.to_html(classes="rent-roll-table", index=False),
        chart_path=chart_path,
        metrics=metrics,
    )

html_content = render_om_html(property_data, summary, rent_roll_df, metrics, chart_path)
Minimum resolution: Enforce at least 1400×900px per image to maintain print quality in the final PDF at 150 DPI.
Step 7
Export the Final PDF
WeasyPrint renders your HTML (with embedded fonts, images, and CSS) into a pixel-perfect multi-page PDF. This is the final production-ready output sent to investors.
from weasyprint import HTML, CSS

def generate_pdf(html_content: str, output_filename: str) -> str:
    """Render HTML to a production-ready PDF."""
    HTML(string=html_content).write_pdf(
        output_filename,
        stylesheets=[CSS(string="@page { margin: 0; }")]
    )
    print(f"[✓] PDF generated: {output_filename}")
    return output_filename

output_path = generate_pdf(
    html_content,
    f"{property_data['property_name'].replace(' ', '_')}_OM.pdf"
)
Output
[✓] PDF generated: Midtown_Office_Tower_OM.pdf
— 14-page investor-ready Offering Memorandum with branding, charts, and AI narrative
Common Challenges
Pitfalls & How to Solve Them
Inconsistent Property Images
Standardize all images to a fixed resolution with Pillow's thumbnail() before insertion. Enforce a minimum of 1400×900px.
LLM Financial Hallucinations
Never ask the LLM to calculate metrics. Compute all numbers in Python with Pandas and only pass pre-calculated values to the model.
Branding Misalignment
Use parameterized CSS variables in your Jinja2 template so brand colors and fonts are injected per brokerage at render time.
Missing Property Data
Use Jinja2 conditionals ({% if data.market_overview %}) so OMs render gracefully even with partial data.
Deployment Costs
Monthly Infrastructure Cost
Generating hundreds of OMs per month remains a fraction of analyst assembly time.
| Component | Monthly Cost |
|---|---|
| LLM API (GPT-4) | $30 – $200 |
| Cloud Compute (AWS/GCP) | ~$50 |
| Storage (S3/GCS) | ~$10 |
| Total | $90 – $260 |
Compared to: $200–$600 per OM in analyst time at 6–20 hours per document.
FAQs
Frequently Asked Questions
Yes. AI handles all narrative sections while Python generates all financial tables and charts. The output is a polished multi-page PDF identical in quality to manually assembled OMs.
Once deployed, generation takes 10–30 seconds per OM. The majority of that time is PDF rendering, not the LLM call.
Yes. Images are normalized via Pillow and injected dynamically into the Jinja2 template. You can also embed Google Maps Static API tiles for location pages.
Yes. The property schema is a Python dictionary that can be populated from any REST API, webhook, or database query.
By never asking the LLM to compute numbers. All financial metrics are computed in Python with Pandas and fed to GPT-4 as ground truth. The model only writes natural-language descriptions.
Want Production OM Automation?
AxcelerateAI builds enterprise-grade OM generation pipelines connected to your CRM, deal database, and brokerage branding systems.